Tuesday 31 July 2012

A Little Bit of Embroidery


In my knitting patterns I use embroidery quite often. I only just noticed that more than half of my patterns have what I call "a little bit of embroidery". And my two sewing patterns on Craftsy (the Rainbow of Owls and Smocked Headband) have a lot.

It is such an easy way to add a little bit of decoration. Embroidery on knitting also has the advantage that the lines formed by the knitting automatically give you a bit of a grid to help you measure and position your embroidery.

But embroidery can be a bit daunting, especially if you are new to it, so I thought I would make a small section of my blog that shows how to do these stitches by picture tutorial. I made a single page recently on how to sew a French Knot, and had some nice feedback. Most of these stitches are quite simple, but you may need to practise a little to get the hang of them. There are other places on the internet that show stitches, but not often done using wool on knitting.

I have put the links in my sidebar. I really wanted to put them as links from this page, but as I have said before I am a bit of a computer half-wit, and just can't work out how to do that. I may move them down from the top eventually, but they will stay somewhere in the sidebar.

I think embroidery can really enhance your knitting. Have fun with it.

If you have found this interesting please bookmark the pages. I plan to add some more stitches in the future.

Wednesday 25 July 2012

"Oh I Do Like To Be Beside The Seaside"


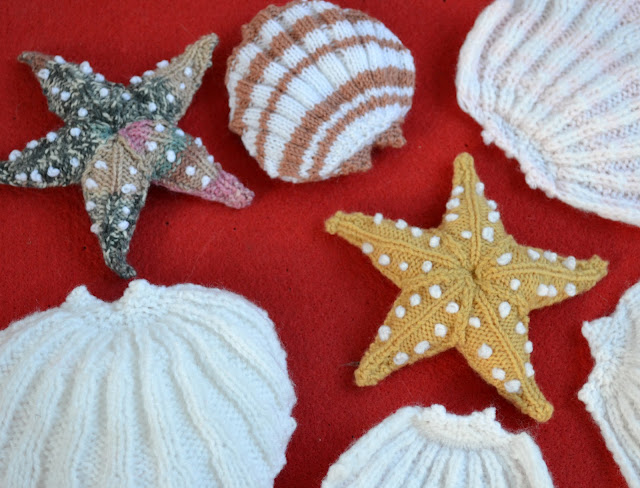
My recent family trip to the seaside, closely followed by a school trip to the Sea Life Centre in Brighton, put in mind that I should branch out a little from the insects and try my hand at some sea creatures, or maybe I should say beach creatures.

The knitting patterns for these sea creatures are available on Ravelry

I have a special offer running on Ravelry, where you can buy any two of my seaside patterns, including my popular spiral shell, and get a £1 discount. I also have a few of my seaside sets for sale for non-knitters in my Etsy Shop.


I have a few more sea creatures in the pipeline, which I am still working on.

I have tried to photograph them below so that you have to look quite hard I hope to see which are knitted and which are real. 


I have been working on the patterns for a while, and am pleased with the way they have turned out. The scallop shell can be knitted as one half, or as two and sewn together and stuffed. I thought it might be nice to make into a lavendar bag. 

Hubby suggested fashioning two shells into a bikini, but soon told him what to do with that idea. Scallops seem to come in a huge variety of colours and patterns, as you can see from the black shell that we found on a beach in Cornwall. So anyone who knits one could really let their imagination go wild.


This version of the starfish has a bit of embroidery, but this is optional. As usual I have tried to go for realism. I have put a page on my blog on how to sew a french knot, as I love using this stitch. I seem to use it a lot, and people think it is difficult, so hope I have shown how simple it is.


This is the underside, which my son says is where a starfish's mouth is?


I have a few more sea creatures in the pipeline, which I am still working on.

Monday 23 July 2012

French Knot

Some of my knitting patterns include a little bit of embroidery. And although there are a lot of places on the internet that show how to do this, particularly on Youtube, I thought I would show how to do some of these stitches on wool using wool. If you haven't done much embroidery they can seem a bit daunting.

I thought I would start with the french knot, which I have used in my ladybird, butterfly patterns, and starfish. It can be really useful, especially for making eyes on little creatures.


First fasten on at the back of your knitting and stitch through to the front


Wind the wool around your needle twice


Sew into your knitting, close to where you came up, but not through the same hole

Troubleshooting: The main ways your french knot might go wrong are if you sew in too close to where you came up. If this happens you will find all your wool seems to disappear with no knot.  Just have another go. A bit of practice and it get easier.

The other thing I find can happen is that if you have too long a piece of wool it just get tangled and does not make the nice little knot. If this does happen just untangle and have another go.

Pull the wool through and you should find yourself with a perfect little french knot

Simple. If you want to make a slightly larger knot you can wrap the wool around the needle three times.


Sunday 22 July 2012

A Philosophical Bag and An African Skirt

The fabric of my latest bag made me think of the quote about the tree falling in a forest, with no one there to hear it. If no one hears it, has it made a sound?


This is my second attempt at making a bag from Amy Butler's book. It is the small teardrop bag. Again I found the cutting out and interfacing the fabric hard work, but really enjoyed the sewing. I love the shape of this bag, and its pleat, but I think the larger version might make a more practical bag.  I like a bag with room to keep a purse, book and numerous other things. My first go at fitting a magnetic clip, which was fairly simple.

Although I have a big box full of fabrics, I found it very hard to find two that would go together well. A lot are things like old curtains, or bits left over from other projects. So I cheated a bit and used the edge of this African waxed cotton for the handle and top band, and the main part of the fabric for the bag.  It is a rather busy pattern, which I am not sure would be to everyone's taste, but I think is rather unique and beautiful.

I love this fabric, which I bought a long time ago in Shepherd's Bush for a skirt project when I was doing my City and Guild. I had to buy a lot more fabric that I really needed as the picture on the wrap around sections of the skirt had to match exactly. 


So here is my African-inspired skirt. I am rather pleased that over 13 years and 2 children later it still (just about if I hold my breath) fits. It was the first garment I made on my fashion course, and my first go at designing a garment and blocking a pattern. The regulations of the course meant all the garments had to have a theme, which led to a few rather unusual outfits.

It has one major design flaw, that it is not comfortable to sit down in. You end up with a beading imprint! So it languishes at the back of my wardrobe, but it took so much work, especially the beading which was all done by hand, that I cannot bear to part with it. And I have made so many different things from the fabric that I had left over, which is really lovely to work with.


Thursday 19 July 2012

Plaiting and Braiding


Have you ever tried to teach a small child how to plait? Actually what I meant to say, have you ever tried to teach a group of small children how to plait? It can be really frustrating, and it can make you feel really miserable when it goes wrong.


One technique I have used is to get the children to practice with a really thick bit of cord. Even better is to have your cord in three different colours.


Another good idea is to tape the plaiting to the table so they can hold it with a bit of tension.


But overall I tended to avoid plaiting with my craft club, as it was just too difficult for most of them.


But I have discovered this really great way to make a braided cord, that I think most children could manage. I'm not sure if this is well known, but I had not heard of it before. If anything the result is nicer than a simple plait. But it is so easy, that so long as we have prepared lengths of wool in advance, my daughter can sit in the back of the car on journeys and braid without any help. It is really fun to make friendship bracelets this way.


So here it is. You need to cut a bit of card in this octagon shape. Cut the 8 slits around, and a hole in the middle.


If you want it to last for several cords, you can reinforce it with tape, but you don't need to do this. Tie seven pieces of wool together, and with the knot in the central hole, put one piece of wool in each of the slots. One slot won't have wool in it. Hold your octagon so this slot is at the bottom. Then simply move the wool from the third slot to the right to the empty slot at the bottom. Keeping the same side of the card facing you, rotate your octagon so the slot that now has no wool is at the bottom, and then move the wool from 3 to the right to this slot. Repeat this for a longish time, letting your braided wool grow backwards out of the central hole.

If you get a bit tired or need to do something else, you can take a break from braiding with this technique, and it won't unravel. Simple. Happy braiding!


Thursday 12 July 2012

Faerie in My Garden


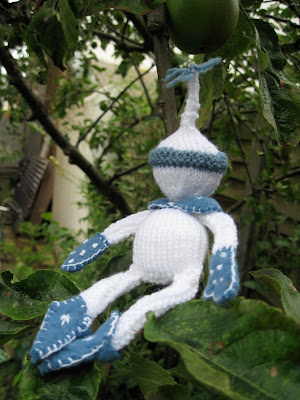
I loved knitting Carrie's Christmas fairy. The pattern is on her Forrestdweller Blog at http://forrestdweller.blogspot.co.uk/2012/07/christmas-fairy-knitting-pattern.html. I think he is quite charming.

All my favourite things: a little bit of knitting, four needles, felt and embroidery. In fact I didn't have the right colour felt to match the blue wool, so had to use fleece instead. Not as nice to sew with.

I love the fact he has no features on his face. I think it is a bit early for him to be a Christmas Fairy (I think he is a boy), so we are going to give him to Frankie's teacher, as an end of year gift. So I may well have to make another one for my tree this year. His collar was not very neat, which is why I have added a little button.


He looks quite at home sitting in my apple tree


Wednesday 11 July 2012

Knits From the Swinging Sixties

A few days ago my next door neighbour brought me round a bag of old magazines. I have a few friends who use me as a decluttering halfway house. They can't bear to throw things out, but are happy to pass them on to me, where I (who am less attached to their possessions) help them on their way. There was a big pile of Woman's Realms, from the 1990's. These were quite fascinating, and I have saved some with interesting knitting patterns. The cookery pages seemed very ordinary compared with today. And the fashion pages looked very dated - big shoulder pads, some very bright colours. 

But tucked between two of these magazines was this gem from the Sixties which I though I would show you. I love the twin set on the cover.


My daughter, who likes short clothes, said that even she would not wear a dress this short!


But this is my favourite. To me the model looks anything but rugged. And I love the sub-title which says "Designed for Slim Chaps".


Sunday 8 July 2012

A Very Very Big Bag

I've been trying to limit the knitting, and do a bit of sewing. As well as my pile of wool, I also have an enormous stash of material, which really needs to be made into something.

My sister gave me (at my request) this book of bag patterns:


At the back is a wallet containing all the patterns. So I thought I would have a first go with what looked like one of the simpler bags: the Reversible Shopper. 

And here is the final product.


The material was a lovely Liberty print, which I bought years ago thinking I might make cushions from it.  I would say that the hardest part seemed to be the cutting out - being reversible there really were a lot of pieces, and they all needed interfacing. I have a little stock of interfacing, but that all got very quickly used up, and I had to go and buy some more. After this the actual sewing of the bag was a bit of breeze.  I did make the mistake of putting both my pockets on the outside, when in fact one is made to be on the inside, so the bag is truly reversible. 

My only problem is I'm not quite sure what to do with my bag now. It really seems too nice to use as a grocery shopping bag. 

I had envisaged keeping my current knitting projects in it. At the moment I keep my knitting in a rather scruffy paper bag. But as all my projects are quite small I think they would be a bit lost in this big bag. It is really really big.

I may have a go making a scaled down version of this for a knitting bag. I am toying with the idea of keeping my stash of wool in it, but at present I have my wool in shallow baskets, which I really like, as it is really easy to find a particular ball without rummaging and unwinding them ...... 

But I guess you could keep anything (or anyone) in a really big bag like this.


I may post some more of my attempts to make bags  .... 

Also "hi" to everyone at Handmade Harbour's Handmade Monday. Have to say you are one of the friendliest link groups I have come across.

Tuesday 3 July 2012

Pipped to the Post by a Pinwheel Purse


Have you ever had a really great idea, only to find out that someone else has already had it. I guess this happens quite a lot with knitting.

Well, I had this great purse idea. It started because my daughter's DT (design technology) project at school is to make a felt purse. As research she asked if she could take an old leather purse of mine into school. I'm quite fond of this purse, as a school friend bought it for me many years ago, in Tunisia. For some reason I keep it in my sewing box.


Anyway, on its trip to school, a boy, whose name I won't mention, snatched at it and ripped the leather. 


So I had been wondering if it would be possible to sew or knit a purse with the same sort of opening. I wasn't sure if it would work with wool, as I thought might just be too bulky with all the layers. And then I was browsing through Ravelry to see what someone who had hearted one of my things had also hearted, and there it was. A perfect little knitted version of my leather purse had already been designed. It is called the Pinwheel Purse in Frankie's Knitted Stuff, which seemed equally strange as that is my daughter's name.


So I have knitted a new purse, to replace my old leather one. It clearly is a great idea, as you can see by the enormous number of people who have knitted this little purse, and linked their projects to the pattern. What I particularly like about the pattern is that it is so simple that once you have done a few rows you don't even need to refer to it.  


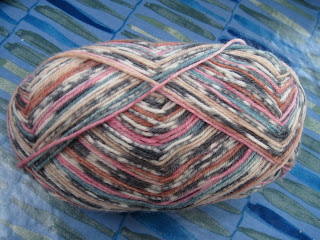
I also thought I'd photograph the wool that I used. It came to me in a bag of oddments. I really love the mixture of colours. It had no label, and wondered if anyone knows what it is?

Oh well, back to the drawing board I guess....

Sunday 1 July 2012

A Little More Smocking

I have been working a bit more on the smocking. I thought it would be nice to do a headband that was a complete hoop. I think it makes a much nicer band, but I have to admit it did make more work. Twice as much smocking. But I find it very therapeutic. I've posted the full instructions on how to make both types of bands on Craftsy.


I had thought about selling the actual headbands on Etsy, but I think I'm going to keep them for my daughter. I've never sold products online, and am not sure how perfect people expect them to be. Also the pricing worries me. When selling at craft fairs I feel people can have a good look and try on before they decide to buy. Someone suggested selling them as kits, which might be worth thinking about.


In the end it all got a bit much for my model. Actually I love this photo too.